Crazy Tech Tricks

  • HOME
  • HOW TO
  • Top 10
  • Android
  • iOS
  • Windows 10
  • Microsoft Office

How to Remove All Third-Party Apps From Facebook At Once

Apr 12, 2018 by Ekaant Puri Leave a Comment

Hello friends, Today I will tell you a method to remove all third-party apps from Facebook at once. Yes! You can remove all the third-party apps, games, etc from your Facebook at once. Users can use this method and select all the apps at once and remove them from your Facebook. It will stop these apps from taking any of your important information.How to Remove All Third-Party Apps From Facebook At Once

Facebook has introduced a new bulk remove the option to remove all third-party apps from Facebook at once. Removing a third party app on Facebook was very tuff when this feature was not introduced. It was a time taking task to remove every app from any Facebook account. But, now Facebook has implemented and solved our problem to remove all third-party apps from Facebook at once. Facebook has seen our time wasting problem very deeply. Though, it has taken a step toward the user’s side. We can now quickly remove all third-party apps from Facebook at once, check it out at the bottom of this article.

Read more: How to Stop Facebook From Sharing Your Data with a 3rd Party

Contents

  • 1 How to Remove All Third-Party Apps From Facebook At Once
      • 1.0.1 Last Words on How to Remove All Third-Party Apps From Facebook At Once
      • 1.0.2 Share this:
      • 1.0.3 Related

How to Remove All Third-Party Apps From Facebook At Once

Removing third-party apps from Facebook is much faster than any other social networking site or application. However, before we were doing a simple thing to remove third-party apps that were to remove them one by one. But, thanks to Facebook that it has implemented the bulk removal option for third-party apps. Now, Facebook made it easy to remove all third-party apps from Facebook at once. Moreover, on Facebook, we can quickly check the list of all available apps which are connected to our Facebook account. So, this time is to disconnect them at once. Let’s start our simple step forward to remove all third-party apps from Facebook at once.

  1. Go to the Facebook website and log in to your account.
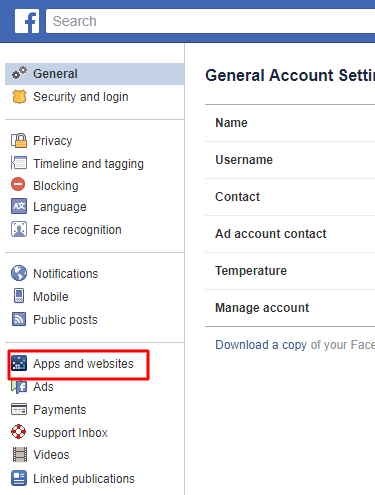
  2. Now, go to the Settings page.
  3. Then, from the bottom-left side click on Apps & Websites.from the bottom-left side click on Apps & Websites. - How to Remove All Third-Party Apps From Facebook At Once
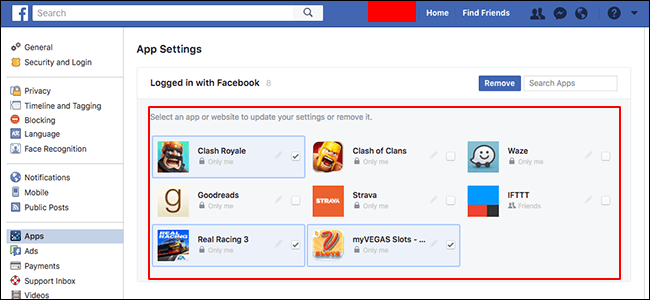
  4. Now, you will see all available third-party apps which are connected to your Facebook account.
  5. Simply, check the checkbox of all the apps and click on Remove to remove all third-party apps from Facebook at once.click on Remove to remove all third-party apps from Facebook at once - How to Remove All Third-Party Apps From Facebook At Once

Read more: How To Contact Facebook Directly and Solve any Issue – 100% Working

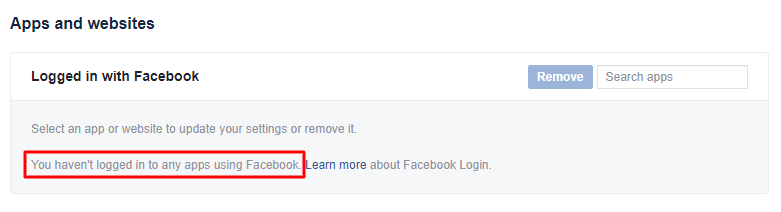
That’s it. Now, you will see that none of the third-party apps is showing on that page. It is all because you have just now removed all third-party apps at once using Facebook’s bulk remove option.

you have just now removed all third-party apps at once using Facebook’s bulk remove option. - How to Remove All Third-Party Apps From Facebook At OnceRead more: How to Delete Facebook Account Permanently Immediately – 100% Working

Last Words on How to Remove All Third-Party Apps From Facebook At Once

In this way, any Facebook user can remove all third-party apps from Facebook at once. No other technique is available to do so. Thus, if someone tells you that grant the permission of this app because this app will do it then don’t believe on that app. Simple head up to this article and learn the easiest way to remove all third-party apps from Facebook at once. You can share this article with your friends too because they are also using Facebook. Thus, they need to know about this technique to remove all third-party apps from Facebook at once.

Share this:

  • Click to share on Facebook (Opens in new window)
  • Click to share on WhatsApp (Opens in new window)
  • Click to share on Twitter (Opens in new window)
  • Click to share on Google+ (Opens in new window)
  • Click to email this to a friend (Opens in new window)
  • Click to print (Opens in new window)
  • Click to share on LinkedIn (Opens in new window)
  • Click to share on Tumblr (Opens in new window)
  • Click to share on Reddit (Opens in new window)
  • Click to share on Pocket (Opens in new window)
  • Click to share on Pinterest (Opens in new window)
  • Share on Skype (Opens in new window)

Related

Filed Under: Facebook, HOME, HOW TO Tagged With: Remove All Third-Party Apps, Third-Party Apps From Facebook

Leave a Reply Cancel reply

Social

  • View crazytechtricks’s profile on Facebook
  • View crazytechtricks’s profile on Twitter
  • View crazytechtricks’s profile on Instagram
  • View crazytechtricks’s profile on Pinterest
  • View crazytechtricks’s profile on Google+

Subscribe to Blog via Email

Enter your email address to subscribe to this blog and receive notifications of new posts by email.

Recent Posts

  • How to Get Wireless Display Windows 10 – 100% Working
  • How to Uninstall Programs in Windows 10 – 100% Working
  • How to Delete a Twitter Account Permanently 2018
  • How to Enable Caps Lock on a Chromebook
  • How to Right Click on Mac Without Mouse – 3 Best Ways
  • How to Take a Screenshot on a Chromebook Without any Software
  • How to Zip a File in Windows 10 Without any Software
  • How to Encrypt a File in Windows 10 – Encrypt Folder Windows 10
  • How to Password Protect a Folder in Windows 10 – Best Method
  • How to Take a Screenshots on iPad – Best Method

Follow

Subscribe to notifications

© Copyright 2015-2018 Crazy Tech Tricks. All Rights Reserved · And Our Sitemap · All Logos & Trademark Belongs To Their Respective Owners·

Disclaimer
Privacy Policy
ABOUT Us
Advertise With US

Copyright © 2018 · eleven40 Pro Theme on Genesis Framework · WordPress · Log in

loading Cancel
Post was not sent - check your email addresses!
Email check failed, please try again
Sorry, your blog cannot share posts by email.