Hello friends, Today I will share top 2 best methods on how to do a system restore on Windows 10. Users can do a system restore on startup Windows 10. You can increase the performance of your Windows PC/Laptop. It will wipe out almost all errors related to malfunctioning of errors. You can get back your Windows PC back to factory mode using this method. I have shared an inbuilt way to do a system restore on Windows 10.
How to do a System Restore on Windows 10
It happens with us that our Windows 10 PC sometimes start malfunctioning. We don’t know that what to do at that moment on our Windows 10 PC/Laptop. But, today I am having a solution for that which is called System Restore. By restoring the system, you will find that your Windows 10 PC has started running smoothly. This is happening because after system resets the Windows PC setting get to the default mode. Though, all the settings get back to its factory mode except your data or folder. So, let us have a look at the methods which I have told in this section to learn that how to do a system restore on Windows 10.
Read more: Complete List of Windows Error Codes – 2018
Method 1 – By System Properties App
System Properties is the app which comes along with every Windows operating system. It is the app which you can not access directly to use it you have to type restore point in the search box and then you will be able to see the app. But, the point is that how to do a system restore on Windows 10 using system properties app right? Well, in this guide I will be showing you that how to do a system restore on Windows 10 using this inbuilt app on your Windows 10 PC/Laptop. Just follow the guide which is given below to know more about it.
- Go to the Start Menu on your Windows 10 PC.
- Now, type Create a restore point then open System Properties from the result.
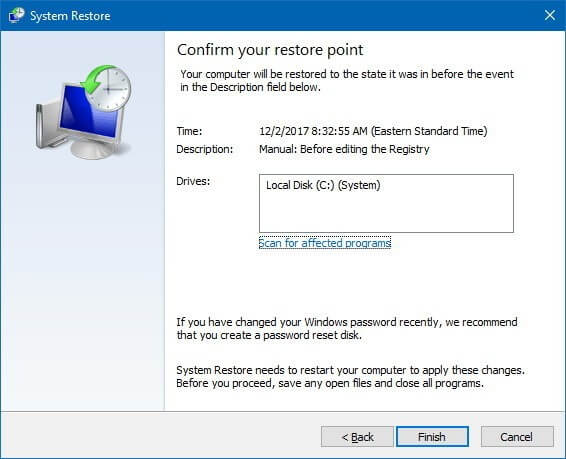
- Then, click System Restore button.
- After that, click on Next button.
- Now, select the recently known working restore point.
- Then, click on Next button.
- Lastly, click on Finish button.
Read more: How to Change Screen Resolution in Windows 10 PC/Laptops 2018
Method 2 – By MiniTool ShadowMaker
MiniTool ShadowMaker is a software which is for Windows operating system. IT helps to restore the system to its default settings. If a Windows user doesn’t know that how to do a system restore on Windows 10. Then, he/she can use MiniTool ShadowMaker to do a system restore on Windows 10 and every other Windows operating system as well. This software is free to use so no charges you have to pay to anyone. Let us explore the method and step by which we can learn how to do a system restore on Windows 10 using MiniTool ShadowMaker software.
- Get the MiniTool ShadowMaker software from its website.
- Now, install it then open it on your Windows 10 PC/Laptop.
- Go to the Restore tab.
- Click on Restore button under Drive to Image box.
- Now, choose the backup version.
- Then, choose a target disk to restore.
- Now, click on Next and confirm the action.
- Lastly, you will see a pop up saying The operation is completed successfully.
Read more: How to Fix External Hard Drive Not Showing in Disk Management in Windows 10, 8.1 & 8
Conclusion
There are methods to know how to do a system restore on Windows 10. By using these methods, you can quickly do a system restore on Windows 10. However, there is no other way to do a system restore on Windows 10. But, if you want to find it then, of course, you can do so. These are the fabulous ways to learn how to do a system restore on Windows 10. Once you have learned how to do a system restore on Windows 10 then you will be able to do a system restore on Windows 10. I hope after reading the entire article you have successfully got the idea about how to do a system restore on Windows 10. If yes, then share it with your colleagues to let them know how to do a system restore on Windows 10.
Trending: How to Recover Unsaved Word Document – Top 5 Best Methods 100% Working

Leave a Reply